Showing posts with label Nail art. Show all posts
Thursday, October 7, 2010
We're Ready For Halloween!
Check out Sara's Spook-Tacular nails! These were completed with colored acrylic, glitter acrylic, hand painted accents and topped off with a couple of Candy Drop Spiders! Come let us make you Spook-Tacular in October!!
Wednesday, August 11, 2010
You don't need new sets all of the time!
When you visit The Purple Pinkie and get a fabulous set of colored/glitter acrylic design nails, your full set is your initial investment of $50. It's $45 for the full set and $5 for the glitter. We then fill those nails for $24 or backfill to change the design for $29. We DO NOT request or require you to get a new full set like other salons. That is nothing more than a ploy to get more money out of you.
Here are some examples of nails that we have done and changed the designs on. The photo above is Kylie's initial set of nails with a gumball theme. Price would be $50 for initial set.
When we filled them, we just added acrylic to the regrowth area and added black accents, and Candy Drop nail art. Price would be $24 for fill and $5 for the 4 Candy Drops.
This time, we went with a whole different design. This is the layered stone design that uses colored acrylic, glitter acrylic, mylar and hand painted accents as well as Candy Drop art. Price would be $29 for this backfill and $5 for 4 Candy Drops.
After a few weeks, Kylie was tired of the design and wanted something simplier. We backfilled the nails and did a glitter fade with a custom black glitter mix and large irridescent glitter with hand painted hybiscus flowers. Price would be $29 for this backfill and $5 for the nail art.
So, moral of this post is, take care of your intial set and it will save you money in the long run. Don't be scammed by salons that require you to do new full sets all of the time. It is NOT necessary!
Sunday, August 1, 2010
Nail Makeovers!
Are you a nail biter? Are you missing a toenail or part of it? Don't walk around in shame, let us help you!! We can transform your bitten nubs into nice nails and we can reconstruct a missing or damaged toenail!
Here are a couple of nail biters that we have applied full sets on. Now this "may" keep them from biting their nails since some people stop when they have product on their nail. They may also chew these suckers off, but while they are on, their nails look 100 times better. We will see how they do!
Here is an example of a damaged toenail that we were able to reconstruct with acrylic. We then did a set of fabulous glitter toes! Wendy was so happy!
So don't walk around ashamed of our hands and feet, let us transform them for you!
Here are a couple of nail biters that we have applied full sets on. Now this "may" keep them from biting their nails since some people stop when they have product on their nail. They may also chew these suckers off, but while they are on, their nails look 100 times better. We will see how they do!
So don't walk around ashamed of our hands and feet, let us transform them for you!
Labels:
acrylic nails,
glitter nails,
glitter toes,
Nail art,
transformations
Sunday, July 18, 2010
Bling Week Continued
(Pictured above is a Magic Manicure with a two color glitter fade.)
Full set of Glitter Acrylic nails with a two color fade and hand-painted accents, with matching Glitter Toes to match!
Gumball Nails with black, hand-painted accents and Candy Drop nail art!
Full set of acrylic nails with a two color glitter fade and black lace impressions and black, hand-painted accents!
Gumball nails with hand-painted accents!
Saturday, September 9, 2006
Nail Art Tutorials
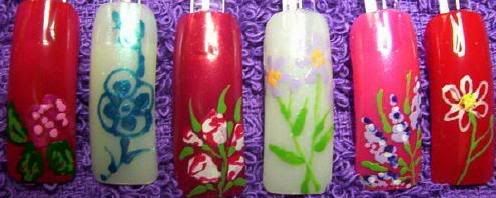
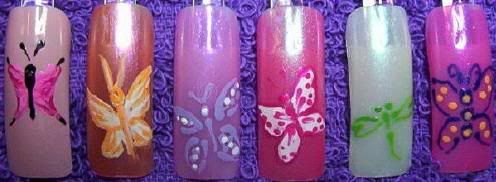
You don't have to be a professional artist to do great nail art designs. Most designs I do in the salon are simple and can be completed in less than two minutes.
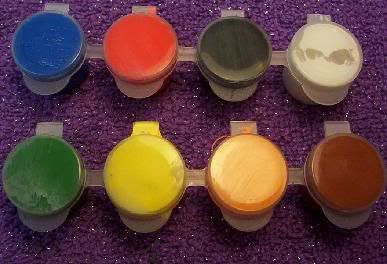
ACRYLIC PAINTS
I just use the cheap paints. I purchase the empty pots in the craft section and fill them with paint. When they get gunky, just throw them away and fill new pots. You can do most nail art with these 8 colors. You can very easily mix other colors.
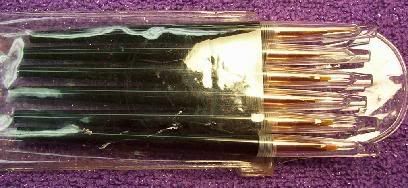
BRUSHES
I use very few brushes. I love this set of nail art brushes that I got. I use the first one the most. These can be purchased from Atwood Industries.

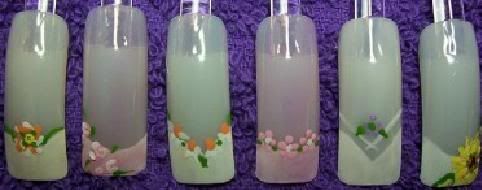
SUNFLOWER
STEP 1 Scribble in brown for the centers of the sunflowers
STEP 2 While brown is still wet, scribble in some orange on one side of each center
STEP 3 With yellow, add petals around the centers
STEP 4 With orange, apply small dots around where the center and petals meet
STEP 5 With green add leaves, with white add shine to the center and veins to leaves

ROSE
STEP 1 Scribble in pink for the background of the roses
STEP 2 Add dark pink dots to the centers of the roses
STEP 3 Add dark pink swooshes around the dots
STEP 4 Add leaves with green
STEP 5 Thin white paint and add veins
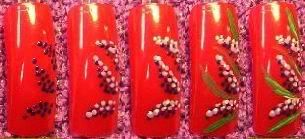
LILAC
STEP 1 Dot in lilacs with dark purple
STEP 2 Add lavender dots to one side of the lilacs
STEP 3 Add white dots to top of the lavender dots
STEP 4 Add leaves with green
STEP 5 Thin white paint and add veins
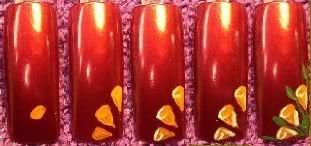
CONE FLOWER
STEP 1 With orange, make an oval
STEP 2 With orange, pull down a "v" to form flower, make three
STEP 3 With white, add a "c" to top of each flower
STEP 4 With white add a line down the one side of each flower
STEP 5 With green, add leaves, with white add veins
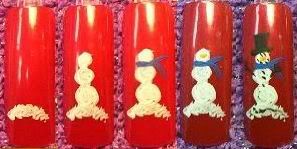
SNOWMAN
STEP 1 Scribble in white for the snow bank
STEP 2 With white, add three circles to form the snowman
STEP 3 With blue, add scarf
STEP 4 With orange add nose
STEP 5 With black add hat, twig arms, face, buttons an detail to the snow bank
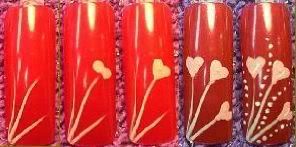
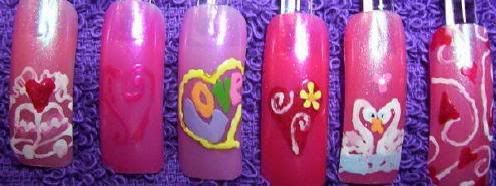
HEART DESIGN
STEP 1 With white, add three white swooshes
STEP 2 Using your stylus or paint brush end, add two circles of pink
STEP 3 While pink is still wet, pull down the paint in the center of the two circles
STEP 4 Complete three hearts
STEP 5 Thin white paint and add shine to the center of the heats and dot details
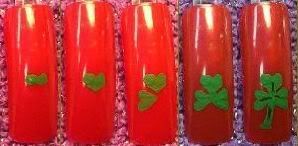
SHAMROCK
STEP 1 With green and your stylus or end of paint brush, make two circles
STEP 2 While paint is still wet, pull down the center to form a heart
STEP 3 Add another heart to the left
STEP 4 Add another heart to the right
STEP 5 Connect hearts and add stem, with black add veins
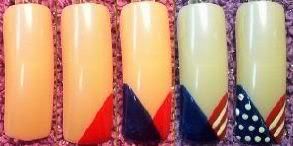
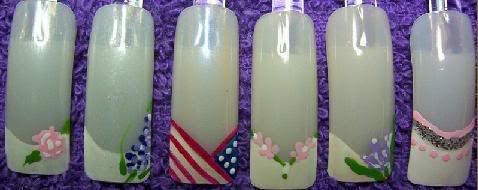
PATRIOTIC
STEP 1 Start with a shimmer on nails
STEP 2 With red, paint a triangle on the right
STEP 3 With blue paint a triangle on the left, overlapping the red
STEP 4 With white add stripes
STEP 5 With white add dots

ACRYLIC PAINTS
I just use the cheap paints. I purchase the empty pots in the craft section and fill them with paint. When they get gunky, just throw them away and fill new pots. You can do most nail art with these 8 colors. You can very easily mix other colors.

BRUSHES
I use very few brushes. I love this set of nail art brushes that I got. I use the first one the most. These can be purchased from Atwood Industries.

SUNFLOWER
STEP 1 Scribble in brown for the centers of the sunflowers
STEP 2 While brown is still wet, scribble in some orange on one side of each center
STEP 3 With yellow, add petals around the centers
STEP 4 With orange, apply small dots around where the center and petals meet
STEP 5 With green add leaves, with white add shine to the center and veins to leaves

ROSE
STEP 1 Scribble in pink for the background of the roses
STEP 2 Add dark pink dots to the centers of the roses
STEP 3 Add dark pink swooshes around the dots
STEP 4 Add leaves with green
STEP 5 Thin white paint and add veins

LILAC
STEP 1 Dot in lilacs with dark purple
STEP 2 Add lavender dots to one side of the lilacs
STEP 3 Add white dots to top of the lavender dots
STEP 4 Add leaves with green
STEP 5 Thin white paint and add veins

CONE FLOWER
STEP 1 With orange, make an oval
STEP 2 With orange, pull down a "v" to form flower, make three
STEP 3 With white, add a "c" to top of each flower
STEP 4 With white add a line down the one side of each flower
STEP 5 With green, add leaves, with white add veins

SNOWMAN
STEP 1 Scribble in white for the snow bank
STEP 2 With white, add three circles to form the snowman
STEP 3 With blue, add scarf
STEP 4 With orange add nose
STEP 5 With black add hat, twig arms, face, buttons an detail to the snow bank

HEART DESIGN
STEP 1 With white, add three white swooshes
STEP 2 Using your stylus or paint brush end, add two circles of pink
STEP 3 While pink is still wet, pull down the paint in the center of the two circles
STEP 4 Complete three hearts
STEP 5 Thin white paint and add shine to the center of the heats and dot details

SHAMROCK
STEP 1 With green and your stylus or end of paint brush, make two circles
STEP 2 While paint is still wet, pull down the center to form a heart
STEP 3 Add another heart to the left
STEP 4 Add another heart to the right
STEP 5 Connect hearts and add stem, with black add veins

PATRIOTIC
STEP 1 Start with a shimmer on nails
STEP 2 With red, paint a triangle on the right
STEP 3 With blue paint a triangle on the left, overlapping the red
STEP 4 With white add stripes
STEP 5 With white add dots
Friday, September 8, 2006
Nubar Nail Art
Subscribe to:
Posts (Atom)